I've only recently started exploring Unity and have always been very interested in ShaderLab. It seems like it can quickly create a variety of visual effects, which is quite fascinating. Well, as someone who's just beginning, I think I'll dive into depth maps and edge detection.
Mini Map Settings
Because I have only created a rough draft, I do not intend to go into details on how to draw small maps in the scene. In general, I have done the following:
- Obtain the bounding box of the scene, which is useful when setting the camera's parameters and position. Configure the mini-map camera to use an orthographic projection, and set the camera's near and far planes based on the bounding box.
- Add a person target for the camera, which will be displayed in the center of the map.
- Update the camera's position each time based on the target's location and the maximum y value of the scene.
Please refer to the code provided later for specific configuration details.
Obtain depth map
Use depthTextureMode to retrieve the depth map.
The camera can save a DepthBuffer or a DepthNormalBuffer (which can be used for edge detection) by simply adjusting the settings.
Then reference it in the shader.
That's it, you can refer to the code I provide later for specific implementations. For the relationship between the depth values stored in the Z-Buffer and the actual world depth, you can refer to these two articles:
Learning to Love your Z-buffer,Linearize depthAdditionally, Unity also provides some functions to calculate depth: Linear01Depth, LinearEyeDepth, etc.
This is not the main topic of discussion here. What I want to say is, originally my camera was set to orthographic projection, so the depth should be linear. However, in my testing, it turned out not to be linear. I then tried to calculate the real-world depth using the method explained in the link above, but it has always been incorrect. I have been unable to calculate the true linear depth, and I don't know if it's a problem with Unity's Z_Buffer or something else. If anyone out there knows, please enlighten me. Of course, if you don't need the real depth values and just want to compare depth sizes or something similar, the method mentioned above is sufficient and quite simple. But for my purposes, I want to map the real depth to color values, requiring the real linear depth values (even though they are also [0, 1]), so I had to resort to using a different method with the RenderWithShader.
Use RenderWithShader to obtain the depth map.
This method is actually just using an example from the Unity Reference: Rendering with Replaced ShadersIt is important to understand that RenderWithShader will render the corresponding Mesh in the scene.
Create a Shader:
Shader "Custom/DepthByReplaceShader"
{
SubShader
{
    Tags { "RenderType"="Opaque" }
    Pass {
        Fog { Mode Off }
        CGPROGRAM
        #pragma vertex vert
        #pragma fragment frag
        #include "UnityCG.cginc"

        struct v2f {
            float4 pos : SV_POSITION;
            float2 depth : TEXCOORD0;
        };

        v2f vert (appdata_base v) {
            v2f o;
            o.pos = mul (UNITY_MATRIX_MVP, v.vertex);
            UNITY_TRANSFER_DEPTH(o.depth);
            return o;
        }

        float4 frag(v2f i) : COLOR {
            //UNITY_OUTPUT_DEPTH(i.depth);
            float d = i.depth.x/i.depth.y;
            return float4(d, d, d, 1);
        }
        ENDCG
    }
}
}
Add a script to your mini-map camera (create one if it doesn't exist), configure the camera to use an orthographic projection, and use this shader to render the scene in the Update() method.
The rendering results will be saved in depthTexture, pretty simple, right?
Map depth to color.
To complete this task, you first need a color chart. This chart can be easily generated using Matlab, for example, I used the "jet" chart in Matlab.
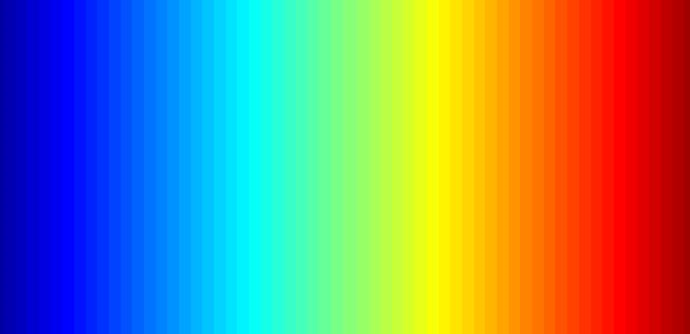
Place this image in the project directory Assets\Resources, and you will be able to access it in the program.
It is important to note that the Wrap Mode of this image should be set to Clamp to prevent interpolation between the color values at the two edges.
Afterward, you need to use the OnRenderImage and Graphics.Blit functions, the prototype of the function is:
void OnRenderImage(RenderTexture src, RenderTexture dst);
static void Blit(Texture source, RenderTexture dest, Material mat, int pass = -1);
The 'src' of this function is the result of camera rendering, and 'dst' is the processed result returned to the camera. Therefore, this function is usually used to apply some effects to the image after camera rendering, such as color mapping on depth and edge detection as we are doing here. The approach is to call 'Graphics.Blit' in 'OnRenderImage', passing a specific 'Material':
It is worth noting that Graphics.Blit actually does the following: it creates a plane the same size as the screen in front of the camera, uses src as the _MainTex of this plane in the Shader, and then places the result into dst, rather than redraw the Mesh in the actual scene.
Color mapping is essentially treating depth [0, 1] as the image's uv, because I want objects closer to the camera to be red, so I inverted the depth:
Edge detection
Edge detection requires using the camera's own _CameraDepthNormalsTexture, primarily utilizing the Normal values, while the depth remains the same as previously calculated. Within each pixel (x, y, z, w) of _CameraDepthNormalsTexture, (x, y) represents the normals, and (z, w) represents the depth. The normals are stored using a specific method, which you can explore if interested.
The code is referencing the edge detection in Unity's built-in Image Effect. The main task is to compare the normal depth of the current pixel with that of neighboring pixels. If the difference is significant, we consider an edge to exist.
inline half CheckSame (half2 centerNormal, half2 sampleNormal, float centerDepth, float sampleDepth)
{
    // difference in normals
    // do not bother decoding normals - there's no need here
    half2 diff = abs(centerNormal - sampleNormal);
    half isSameNormal = (diff.x + diff.y) < 0.5;

    // difference in depth
    float zdiff = abs(centerDepth-sampleDepth);
    // scale the required threshold by the distance
    half isSameDepth = (zdiff < 0.09 * centerDepth) || (centerDepth < 0.1);

    // return:
    // 1 - if normals and depth are similar enough
    // 0 - otherwise
    return isSameNormal * isSameDepth;
}
The complete Shader is as follows:
Shader "Custom/DepthColorEdge" {

Properties
{
    _DepthTex ("Depth Tex", 2D) = "white" {}
    _ColorMap ("Color Map", 2D) = "white" {}
}
    SubShader
    {
        Tags { "RenderType"="Opaque" }
        LOD 200
        Pass
        {
            ZTest Always Cull Off ZWrite Off
            Fog { Mode off }
            CGPROGRAM
            #pragma vertex vert
            #pragma fragment frag
            #include "UnityCG.cginc"
            sampler2D _CameraDepthNormalsTexture;
            sampler2D _DepthTex;
            uniform float4 _DepthTex_TexelSize;
            sampler2D _ColorMap;
            float _ZNear;
            float _ZFar;

            struct v2f
            {
                float4 pos : SV_POSITION;
                float2 uv[3] : TEXCOORD0;
            };

            v2f vert (appdata_base v)
            {
                v2f o;
                o.pos = mul (UNITY_MATRIX_MVP, v.vertex);
                o.uv[0] = MultiplyUV( UNITY_MATRIX_TEXTURE0, v.texcoord );
                o.uv[1] = o.uv[0] + float2(-_DepthTex_TexelSize.x, -_DepthTex_TexelSize.y);
                o.uv[2] = o.uv[0] + float2(+_DepthTex_TexelSize.x, -_DepthTex_TexelSize.y);
                return o;
            }


            inline half CheckSame (half2 centerNormal, half2 sampleNormal, float centerDepth, float sampleDepth)
            {
                // difference in normals
                // do not bother decoding normals - there's no need here
                half2 diff = abs(centerNormal - sampleNormal);
                half isSameNormal = (diff.x + diff.y) < 0.5;

                // difference in depth
                float zdiff = abs(centerDepth-sampleDepth);
                // scale the required threshold by the distance
                half isSameDepth = (zdiff < 0.09 * centerDepth) || (centerDepth < 0.1);

                // return:
                // 1 - if normals and depth are similar enough
                // 0 - otherwise
                return isSameNormal * isSameDepth;
            }

            half4 frag(v2f i) : COLOR
            {
                // get color based on depth
                float depth = tex2D (_DepthTex, i.uv[0]).r;
                half4 color = tex2D(_ColorMap, float2(saturate(1-depth), 0.5));

                // detect normal diff
                half2 centerNormal = tex2D(_CameraDepthNormalsTexture, i.uv[0]).xy;
                half2 sampleNormal1 = tex2D (_CameraDepthNormalsTexture, i.uv[1]).xy;
                half2 sampleNormal2 = tex2D (_CameraDepthNormalsTexture, i.uv[2]).xy;
                float sampleDepth1 = tex2D (_DepthTex, i.uv[1]).r;
                float sampleDepth2 = tex2D (_DepthTex, i.uv[2]).r;
                color *= CheckSame(centerNormal, sampleNormal1, depth, sampleDepth1);
                color *= CheckSame(centerNormal, sampleNormal2, depth, sampleDepth2);

                return color;
            }
            ENDCG
        }

    }
    FallBack "Diffuse"
}
The result is similar to this one:

Blend real-world images.
Simply using a single deep color map might be a bit dull. To spice things up, we can mix in colors from actual scenes. All you need to do is create another shader, input the previous image and the camera's real image, and blend them in OnRenderImage.
Shader "Custom/ColorMixDepth" {
    Properties {
        _MainTex ("Base (RGBA)", 2D) = "white" {}
        _DepthTex ("Depth (RGBA)", 2D) = "white" {}
    }
    SubShader {
        Tags { "RenderType"="Opaque" }
        LOD 200

        CGPROGRAM
        #pragma surface surf Lambert

        sampler2D _MainTex;
        sampler2D _DepthTex;

        struct Input {
            float2 uv_MainTex;
            float2 uv_DepthTex;
        };

        void surf (Input IN, inout SurfaceOutput o) {
            half4 c = tex2D (_MainTex, IN.uv_MainTex);
            half4 d = tex2D (_DepthTex, IN.uv_DepthTex);
            //d = d.x == 1? 0 : d;
            o.Albedo = c.rgb*0.1 + d.rgb*0.9;
            o.Alpha = 1;
        }
        ENDCG
    }
    FallBack "Diffuse"
}
void OnRenderImage(RenderTexture src, RenderTexture dst)
{
    // if now rendering depth map
    if (isRenderDepth)
    {
        depthEdgeMaterial.SetTexture("_DepthTex", src);
        if(isUseColorMap)
            Graphics.Blit(src, dst, depthEdgeMaterial);
        else
            Graphics.Blit(src, dst);
        return;
    }
    // else rendering real color scene, mix the real color with depth map
    else
    {
        mixMaterial.SetTexture("_MainTex", src);
        mixMaterial.SetTexture("_DepthTex", depthTexture);
        Graphics.Blit(src, dst, mixMaterial);
        ReleaseTexture();
    }
}
RenderWithShader, OnRenderImage is also triggered. In other words, this function is called twice, and the tasks it needs to perform during these two calls are different. Therefore, I'm using a variable here to indicate whether the current rendering state is for creating a depth map or for blending.
Complete code
There are quite a few code files, so I’m putting them here depth-minimap.
Original: https://wiki.disenone.site/en
This post is protected by CC BY-NC-SA 4.0 agreement, should be reproduced with attribution.
Visitors. Total Visits. Page Visits.
This post was translated using ChatGPT. Please provide feedback in FeedbackPlease point out any omissions.